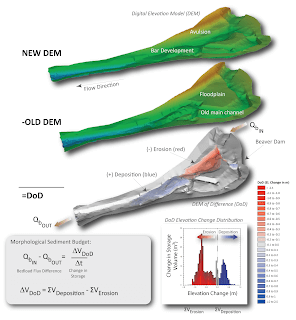
The ability to perform a change detection by subtracting two topographic surveys is the fundamental reason that the GCD Software exists.
While at it’s heart this appears to be a simple operation, it’s the process of calculating and then visualizing the uncertainty that is the focus of the GCD software.
This section of the GCD help describes the basic process of performing a change detection analysis and then visualizing the results. The following sections expand on this information with more advanced topics:
- Exploring Change Detection Results
- Batch change detection
- Multi-epoch change detection
- Budget segregating a change detection
- Morphological analysis of a change detection
- Inter-comparing change detections
Calculating a Change Detection
Before performing any kind of change detection you must have at least two DEM Surveys in your GCD project and depending on the way that you want to represent uncertainty, each DEM might require an error surface.
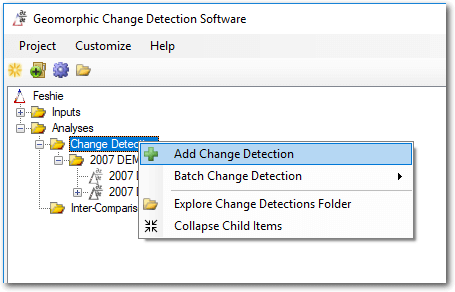
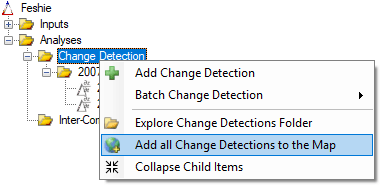
Expand the Analyses section of the GCD Project Explorer and right click on Change Detection.
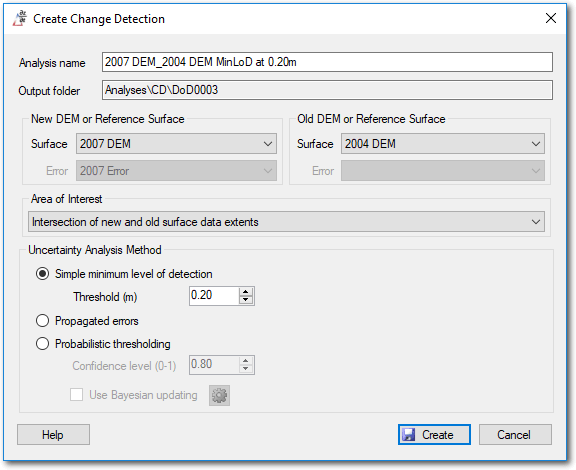
The change detection form requires the following inputs:
- Choose a unique analysis name that does not already exists in the GCD project. The GCD software will suggest a name based on the inputs selected below. You can override this should you choose.
- The output folder is defined by the GCD software and cannot be changed.
- Surfaces - both DEM Surveys and reference surfaces can be used as the new and old rasters in a change detection analysis.
- Error surfaces are mandatory if choose the propagated error or probabilistic thresholding method, but are not required if you are using the minimum level of detection method.
- Area of Interest - leave this option as the intersection of the new and old surface data extents to calculate change everywhere that both surfaces possess data. This is the default. Alternatively you can select an area of interest to ignore certain areas of your data if you want to restrict the calculation.
- Uncertainty Analysis Method - three methods of accounting for uncertainty are available. It is recommended that you research them using the links below. Note that you must specify error surfaces for the new and old surfaces if you choose the latter two methods.
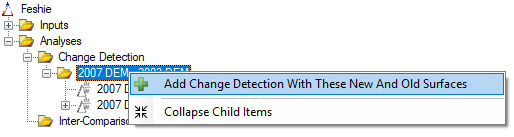
Reusing the same Surfaces
If you want to produce another change detection using the same new and old surfaces as an existing analysis then right click on the item in the project explorer that represents the pair of surfaces and choose “”:
Context Menu
Right clicking on an individual change detection in the project explorer displays a context menu that includes several operations described below. The following more involved items are described on their own pages:
The Add To Map options are only available in the ArcGIS Addin version of GCD and not the Standalone.
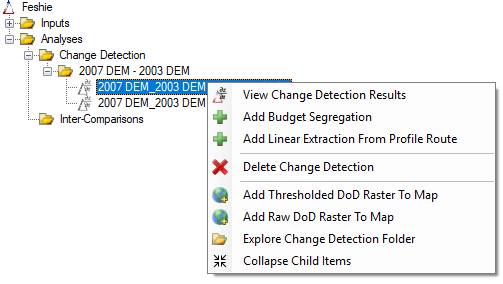
Delete Change Detection
Deleting a change detection deletes all files associated with the analysis including dependent items such as budget segregations and morphological analyses.
Note that no files related to the analysis being deleted should be open in other software when you attempt to delete the change detection or you will get a warning.
Add To Map
Both the raw and the thresholded DoD rasters can be added to the current ArcMap document. The former represents all change between the new and old surfaces, without any thresholding applied. The latter is the same change result but with thresholding applied.
It is also possible to add all thresholded rasters for all analyses to the map with one command by right clicking on the change detection item in the project explorer:
A brief video showing how to utilize both of these commands is shown below:
Explore Change Detection Folder
Exploring the change detection folder item will launch Windows Explorer at the location of the change detection results folder on your hard drive. See the Files and Folders section of the change detection results documentation.